Quick Start
Welcome to Anti-Cloud Secure Meet! This guide will help you set up your first meeting room.
If you haven’t signed up to Anti-Cloud Secure Meet (ACSM), sign up here. (However, if someone else in your organization has signed up to ACSM, they are the administrator of your account – contact them for access to ACSM rooms.)
Manager App
When you sign up for ACSM, you will be emailed the URL of the ACSM manager app on your private ACSM domain (for example, https://my-company.acsm.myanti.cloud/manager). Open this URL in any web browser.
Log In
To log in, on the manager app Log In page, do the following:
- Enter the username you used to sign up for the Anti-Cloud Service into the Username field.
- Enter the password you used to sign up for the Anti-Cloud Service into the Password field.
- Click the Log In button.
Add a Room
To create your first room, do the following:
- Click the Rooms link in the header bar.
- Click the New Room button.
- Enter “HelloWorld” into the Name field.
- Click the Create button.
This will create your first room. Click the name of the room to view its details.
On the room details page, the URL to the room will be listed (it will be something like https://my-company.acsm.myanti.cloud/join/HelloWorld). You can use the Edit Room button on this page to change the room name. You can rename rooms whenever you like; just note that changing the room name will change the room URL.
You can create as many rooms as you like, or delete them if you’re not using them. You will be billed monthly for the number of rooms you have, pro-rated by day.
You can use the Edit Users button on this page to assign moderator users to this room; however, you haven’t created any users yet – so create one now.
Add a User
To create your first user, do the following:
- Click the Users link in the header bar.
- Click the New User button.
- Enter “ItsMe” into the Username field.
- Enter your email address (for example,
me@example.com) into the Email field. - Click the Create button.
This will create your first user, and send you an email with a link to set the password for the user.
On the user details page, you can use the Edit User button to change the username or email address of the user account; or the Send Password button to send another email with a link to set the user’s password.
You can create as many users as you like, or delete them if you’re not using them. Users have no impact on billing.
Assign Rooms
To assign rooms to this new user, from the user details page, do the following:
- Click the Edit Rooms button.
- Select the “HelloWorld” room in the Rooms field. (TIP: if there are multiple rooms in this list, control-click items in the list to select multiple rooms.)
- Click the Update button.
This will assign the “HelloWorld” room to the “ItsMe” user.
You can assign or remove users to or from rooms as much as you like. Room assignments have no impact on billing.
Set Password
To set the password for the new user, do the following:
- Check the email inbox for the email address you entered in the Add a User step above.
- Open the email with the subject “set password for Anti-Cloud Secure Meet”.
- Click the set-password link in the body of this email.
- Enter “Password123!” (or whatever password you’d rather use for this user) into the New Password field.
- Click the Update button.
If you don’t see a set-password email for Anti-Cloud Secure Meet in your email inbox, do the following:
- Return to the manager app, and go back to the user details page for the user.
- Click the Send Password button.
- Click the Send button.
- Check the email inbox corresponding to the user’s email address.
Meeting UI
Once you’ve created one room, created one user, assigned the user to the room, and set the user’s password, you’re ready to start your first meeting.
Go back to your email inbox, and open the set-password email again. Click the link to the meeting log-in page in the body of this email (it will be something like https://my-company.acsm.myanti.cloud/login).
Log In
To log in, on the meeting UI Login page, do the following:
- Enter “ItsMe” into the Username field. (TIP: this field is case sensitive.)
- Enter “Password123!” into the Password field. (TIP: this field is case sensitive.)
- Click the Login button.
Select a Room
To start a meeting, on the Pick Name page, do the following:
- Select the “HelloWorld” room. (TIP: if you’ve assigned multiple rooms to this user, click the room name to select a different room.)
- Click the Join Room button.
This will start the meeting in this room. If a meeting was already in progress in this room, you would join the room as a guest; if a meeting is not already in progress, you will join as the moderator.
Share the Room
When you join a room as the moderator, the room will initially be empty, and a Share the Room dialog will be displayed. You may do the following:
- Click the Copy URL button to copy the URL for this room, and paste it into a calendar invite, email, or other message inviting guests to the room.
- Click the Email Invite button to open a new draft email in your email app with the URL for this room. (NOTE: this requires your computer to be configured to open your email app for
email:URLs.) - Click the Close button to dismiss the dialog.
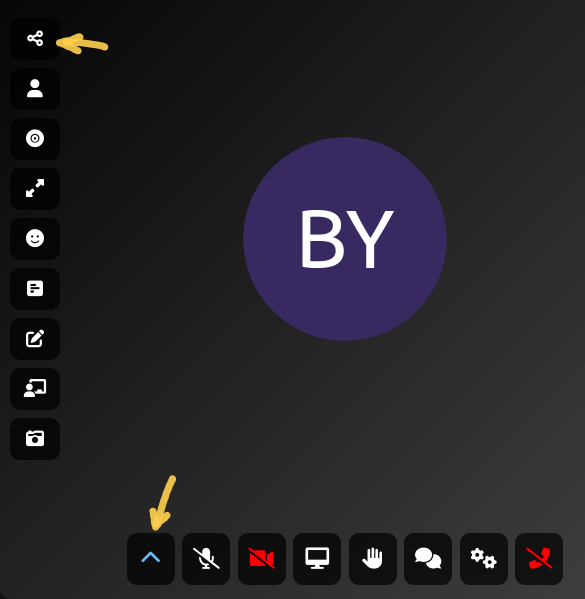
After you click the Close button, you can re-open the Share the Room dialog later. To re-open the Share the Room dialog, do the following:
- Move your mouse to the bottom of the browser window. A set of buttons will appear at the bottom of the window.
- Hover the mouse over the left-most button at the bottom of the window (labeled Toggle extra buttons). Another set of buttons will appear at the left side of the window.
- Click the top-most button at the left side of the window (labeled Share room).
Anyone with whom you share the room URL will be able to join the meeting, simply by opening this URL in any web browser.
Leave the Room
To end a meeting, do the following:
- Move your mouse to the bottom of the browser window. A set of buttons will appear at the bottom of the window.
- Click the right-most button at the bottom of the window (labeled Leave room).
You will leave the meeting. The meeting will end when all participants have left the meeting.
Next Steps
To learn more about administering ACSM, see the full Administration guide.
To learn more about the moderator-only features of ACSM, see the Moderator Features documentation.
To learn more about the features of ACSM that both moderators and guests can use, see the Meeting Features documentation.